No edit summary Tag: sourceedit |
mNo edit summary |
||
| (4 intermediate revisions by 3 users not shown) | |||
| Line 1: | Line 1: | ||
| + | {{DISPLAYTITLE:Vista Spots}}{{game|2015=y}} |
||
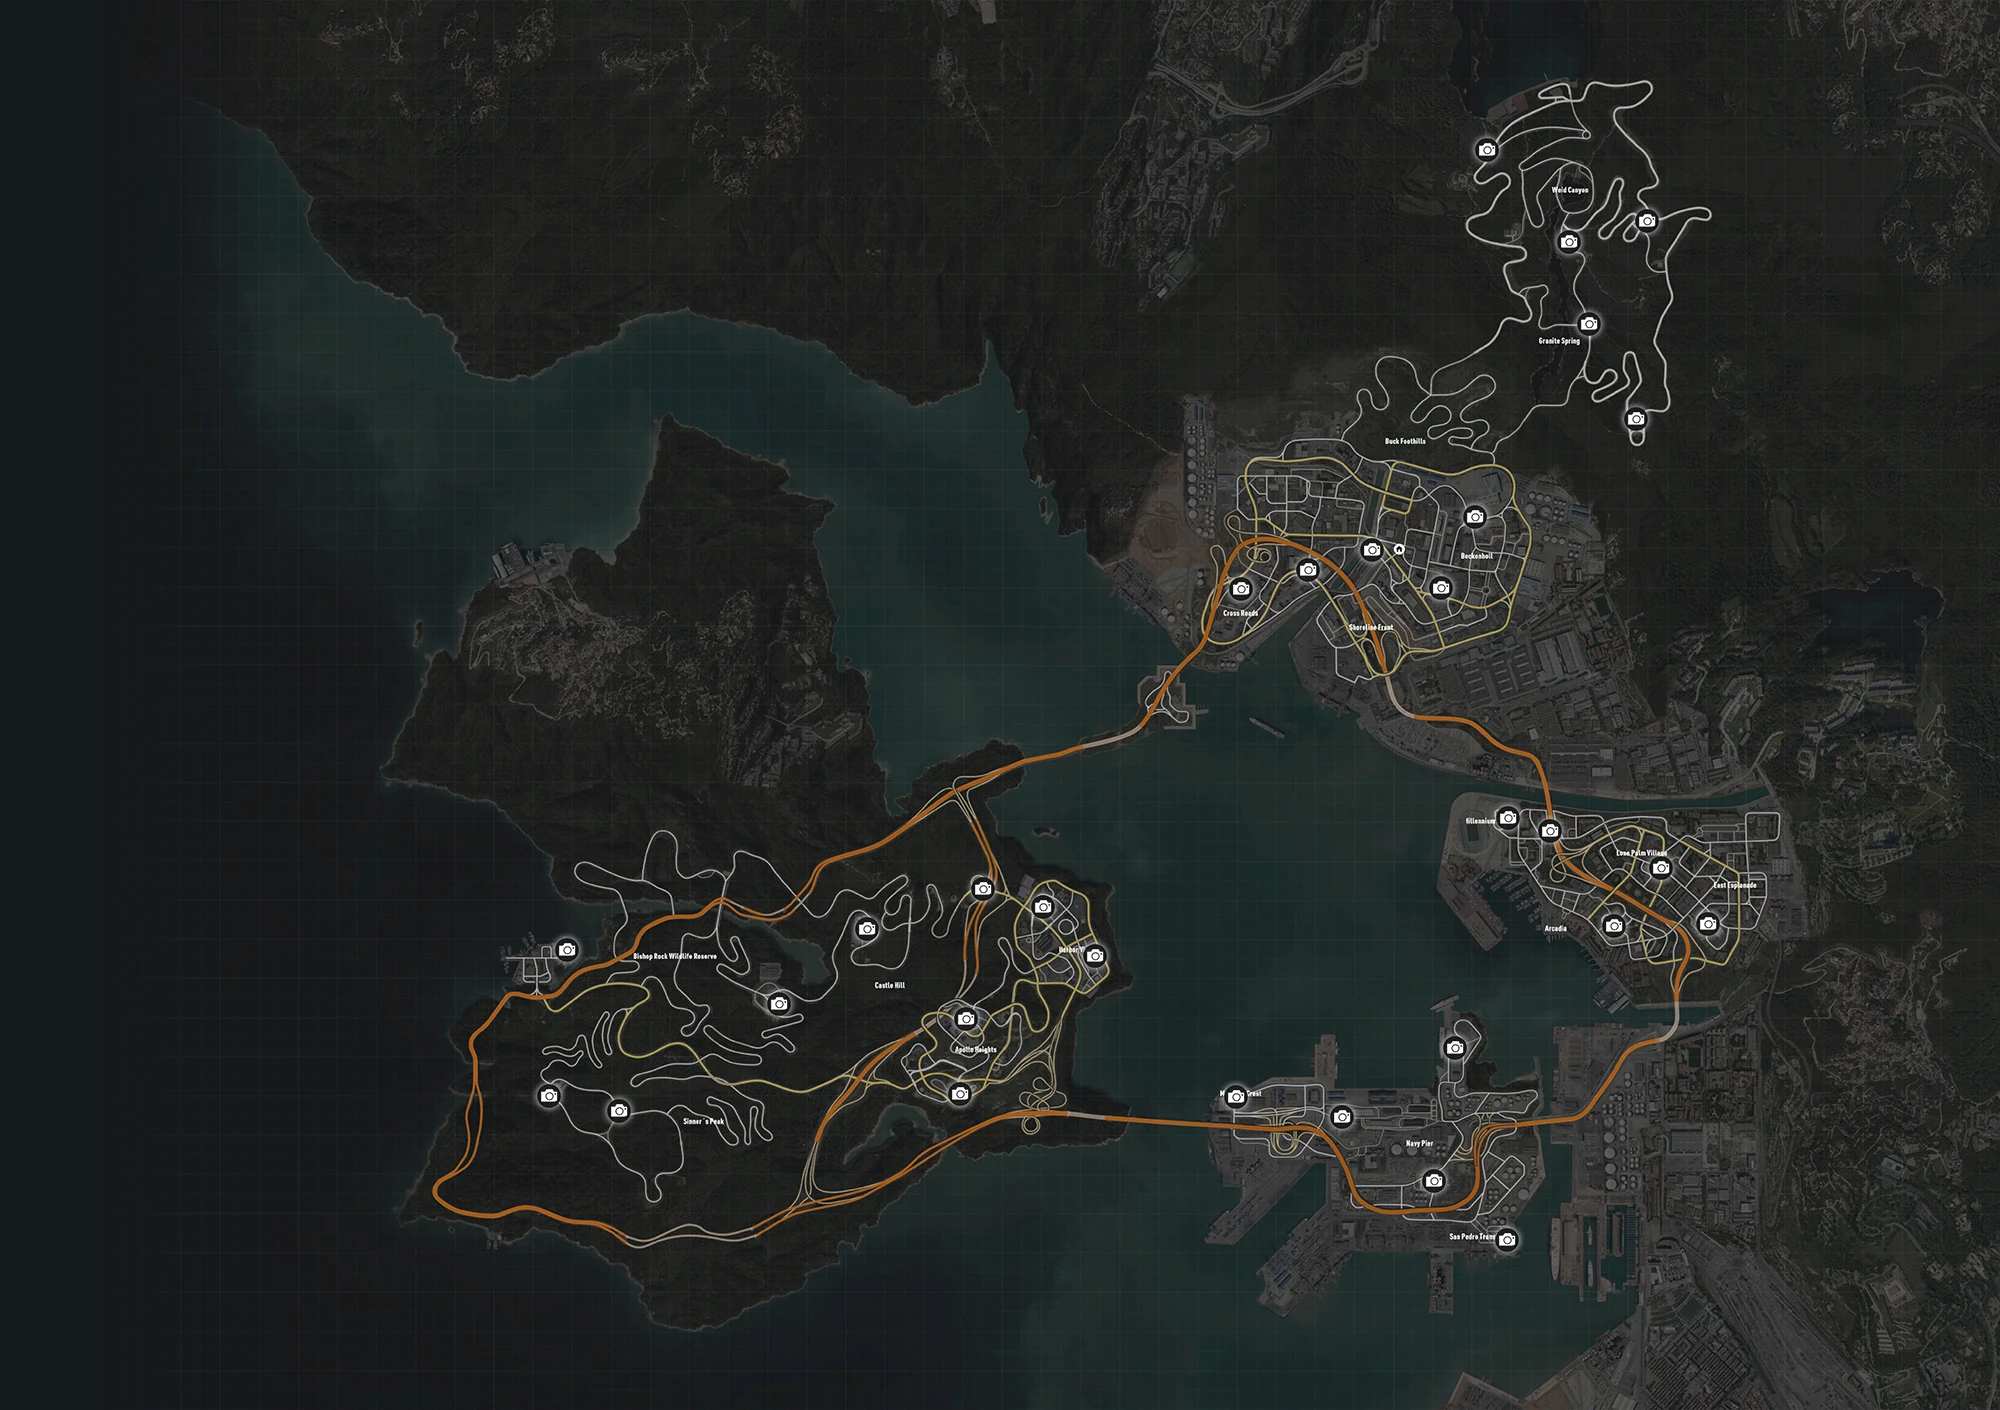
[[File:NFS2015TVistaPointMapIcon.png|right]]'''Vista Spots''' in [[Need for Speed (2015)]] are [[Need for Speed (2015)/Collectables|collectable]] locations dotted around [[Ventura Bay]]. There is a total of 30 Vista Spots breaking down into five locations within each district. |
[[File:NFS2015TVistaPointMapIcon.png|right]]'''Vista Spots''' in [[Need for Speed (2015)]] are [[Need for Speed (2015)/Collectables|collectable]] locations dotted around [[Ventura Bay]]. There is a total of 30 Vista Spots breaking down into five locations within each district. |
||
Vista Spots are highlighted by an icon representing a single-lens reflex camera. This icon will appear on the player's minimap and above a Vista Spot's location. |
Vista Spots are highlighted by an icon representing a single-lens reflex camera. This icon will appear on the player's minimap and above a Vista Spot's location. |
||
| − | [[File:VenturaBayVistaMap.jpg|right|200px]]Driving near a Vista Spot will trigger a prompt to capture an image of the location. Pressing the button highlighted by the prompt will capture a [[need for Speed (2015)/Snapshot| |
+ | [[File:VenturaBayVistaMap.jpg|right|200px]]Driving near a Vista Spot will trigger a prompt to capture an image of the location. Pressing the button highlighted by the prompt will capture a [[need for Speed (2015)/Snapshot|snapshot]] of the location and may include the player's car in the image. |
Captured Vista Spots will appear with a green tick icon next to their collectable icon above their location, and will be shown on the player's phone map. |
Captured Vista Spots will appear with a green tick icon next to their collectable icon above their location, and will be shown on the player's phone map. |
||
==Vista Spots== |
==Vista Spots== |
||
| + | {|class="nfs2015" style="font-size: 90%" |
||
| − | {|class="wikitable" align="center" style="border: 2px solid #ebe9eb; width: 100%; background: #4c505b; text-align: center; color: #ebe9eb; padding: 0px; margin: 0px 0px 0px 0px; font-size: 90%" cellpadding="0" cellspacing="0" |
||
| + | !style="width: 200px"|Title |
||
| − | !style="border-bottom: 1px solid #ebe9eb; background: #ebe9eb; color: #4c505b; border-right: 1px solid transparent; width: 200px"|Title |
||
| + | !Location |
||
| − | !style="border-bottom: 1px solid #ebe9eb; background: #ebe9eb; color: #4c505b; border-right: 1px solid transparent"|Location |
||
| + | !width: 2px" colspan="3"| |
||
|- |
|- |
||
{{NFS2015Collect|[[Need_for_Speed_(2015)/Apollo Heights|Apollo Heights]]|Apollo Heights, Franklin Terrace}} |
{{NFS2015Collect|[[Need_for_Speed_(2015)/Apollo Heights|Apollo Heights]]|Apollo Heights, Franklin Terrace}} |
||
| Line 16: | Line 18: | ||
{{NFS2015Collect|[[Need_for_Speed_(2015)/BBA Industries|BBA Industries]]|BBA Industries, Franklin Terrace}} |
{{NFS2015Collect|[[Need_for_Speed_(2015)/BBA Industries|BBA Industries]]|BBA Industries, Franklin Terrace}} |
||
{{NFS2015Collect|[[Need_for_Speed_(2015)/Beckenholl View|Beckenholl View]]|Ekeya, Burnwood}} |
{{NFS2015Collect|[[Need_for_Speed_(2015)/Beckenholl View|Beckenholl View]]|Ekeya, Burnwood}} |
||
| − | {{NFS2015Collect|[[Need_for_Speed_(2015)/Bishop Rock Hills|Bishop Rock Hills]]|Sinner's Peak, El |
+ | {{NFS2015Collect|[[Need_for_Speed_(2015)/Bishop Rock Hills|Bishop Rock Hills]]|Sinner's Peak, El Rey}} |
| − | {{NFS2015Collect|[[Need_for_Speed_(2015)/Castle Hill Water Treatment Plant|Castle Hill Water Treatment Plant]]|Castle Hill, El |
+ | {{NFS2015Collect|[[Need_for_Speed_(2015)/Castle Hill Water Treatment Plant|Castle Hill Water Treatment Plant]]|Castle Hill, El Rey}} |
{{NFS2015Collect|[[Need_for_Speed_(2015)/Crescent Mountain View|Crescent Mountain View]]|Crescent Mountains Bridge, Crescent Mountains}} |
{{NFS2015Collect|[[Need_for_Speed_(2015)/Crescent Mountain View|Crescent Mountain View]]|Crescent Mountains Bridge, Crescent Mountains}} |
||
{{NFS2015Collect|[[Need_for_Speed_(2015)/Cross Roads View|Cross Roads View]]|Interstate 5 Intersection, Burnwood}} |
{{NFS2015Collect|[[Need_for_Speed_(2015)/Cross Roads View|Cross Roads View]]|Interstate 5 Intersection, Burnwood}} |
||
{{NFS2015Collect|[[Need_for_Speed_(2015)/East Esplanade Old Industrial|East Esplanade Old Industrial]]|East Esplanade Old Industrial, Royal Park}} |
{{NFS2015Collect|[[Need_for_Speed_(2015)/East Esplanade Old Industrial|East Esplanade Old Industrial]]|East Esplanade Old Industrial, Royal Park}} |
||
| − | {{NFS2015Collect|[[Need_for_Speed_(2015)/El |
+ | {{NFS2015Collect|[[Need_for_Speed_(2015)/El Rey Pier|El Rey Pier]]|El Rey Pier, El Rey}} |
{{NFS2015Collect|[[Need_for_Speed_(2015)/Franklin Terrace View|Franklin Terrace View]]|Interstate 6 Intersection, Franklin Terrace}} |
{{NFS2015Collect|[[Need_for_Speed_(2015)/Franklin Terrace View|Franklin Terrace View]]|Interstate 6 Intersection, Franklin Terrace}} |
||
{{NFS2015Collect|[[Need_for_Speed_(2015)/Ghost Stadium|Ghost Stadium]]|Millennium Plaza, Royal Park}} |
{{NFS2015Collect|[[Need_for_Speed_(2015)/Ghost Stadium|Ghost Stadium]]|Millennium Plaza, Royal Park}} |
||
| Line 33: | Line 35: | ||
{{NFS2015Collect|[[Need_for_Speed_(2015)/San Pedro Docks|San Pedro Docks]]|San Pedro Transfer, South Port}} |
{{NFS2015Collect|[[Need_for_Speed_(2015)/San Pedro Docks|San Pedro Docks]]|San Pedro Transfer, South Port}} |
||
{{NFS2015Collect|[[Need_for_Speed_(2015)/Shoreline Front Bay|Shoreline Front Bay]]|Cross Roads, Burnwood}} |
{{NFS2015Collect|[[Need_for_Speed_(2015)/Shoreline Front Bay|Shoreline Front Bay]]|Cross Roads, Burnwood}} |
||
| − | {{NFS2015Collect|[[Need_for_Speed_(2015)/Sinner's Peak Observatory|Sinner's Peak Observatory]]|Sinner's Peak Observatory, El |
+ | {{NFS2015Collect|[[Need_for_Speed_(2015)/Sinner's Peak Observatory|Sinner's Peak Observatory]]|Sinner's Peak Observatory, El Rey}} |
{{NFS2015Collect|[[Need_for_Speed_(2015)/South Port Bridge|South Port Bridge]]|Manches Crest, South Port}} |
{{NFS2015Collect|[[Need_for_Speed_(2015)/South Port Bridge|South Port Bridge]]|Manches Crest, South Port}} |
||
{{NFS2015Collect|[[Need_for_Speed_(2015)/VB Petrochemical Plant|VB Petrochemical Plant]]|VB Petrochemical Plant, South Port}} |
{{NFS2015Collect|[[Need_for_Speed_(2015)/VB Petrochemical Plant|VB Petrochemical Plant]]|VB Petrochemical Plant, South Port}} |
||
{{NFS2015Collect|[[Need_for_Speed_(2015)/Ventura Bay Art Centre|Ventura Bay Art Centre]]|Ventura Bay Art Centre, South Port}} |
{{NFS2015Collect|[[Need_for_Speed_(2015)/Ventura Bay Art Centre|Ventura Bay Art Centre]]|Ventura Bay Art Centre, South Port}} |
||
| − | {{NFS2015Collect|[[Need_for_Speed_(2015)/Ventura Bay Ocean View|Ventura Bay Ocean View]]|Sinner's Peak, El |
+ | {{NFS2015Collect|[[Need_for_Speed_(2015)/Ventura Bay Ocean View|Ventura Bay Ocean View]]|Sinner's Peak, El Rey}} |
{{NFS2015Collect|[[Need_for_Speed_(2015)/Ventura Bay Skyline|Ventura Bay Skyline]]|Los Sol Bridge, Burnwood}} |
{{NFS2015Collect|[[Need_for_Speed_(2015)/Ventura Bay Skyline|Ventura Bay Skyline]]|Los Sol Bridge, Burnwood}} |
||
{{NFS2015Collect|[[Need_for_Speed_(2015)/Ventura Downtown|Ventura Downtown]]|Beckenroll, Burnwood}} |
{{NFS2015Collect|[[Need_for_Speed_(2015)/Ventura Downtown|Ventura Downtown]]|Beckenroll, Burnwood}} |
||
| Line 44: | Line 46: | ||
{{NFS2015Nav}} |
{{NFS2015Nav}} |
||
[[Category:Collectables (Need for Speed (2015))]] |
[[Category:Collectables (Need for Speed (2015))]] |
||
| + | [[pl:Punkty widokowe]] |
||
Revision as of 09:05, 28 June 2018

Vista Spots in Need for Speed (2015) are collectable locations dotted around Ventura Bay. There is a total of 30 Vista Spots breaking down into five locations within each district.
Vista Spots are highlighted by an icon representing a single-lens reflex camera. This icon will appear on the player's minimap and above a Vista Spot's location.
Driving near a Vista Spot will trigger a prompt to capture an image of the location. Pressing the button highlighted by the prompt will capture a snapshot of the location and may include the player's car in the image.
Captured Vista Spots will appear with a green tick icon next to their collectable icon above their location, and will be shown on the player's phone map.
Vista Spots
| Title | Location | |||
|---|---|---|---|---|
| Apollo Heights | Apollo Heights, Franklin Terrace | |||
| Arcadia Park | Arcadia Park, Royal Park | |||
| BBA Industries | BBA Industries, Franklin Terrace | |||
| Beckenholl View | Ekeya, Burnwood | |||
| Bishop Rock Hills | Sinner's Peak, El Rey | |||
| Castle Hill Water Treatment Plant | Castle Hill, El Rey | |||
| Crescent Mountain View | Crescent Mountains Bridge, Crescent Mountains | |||
| Cross Roads View | Interstate 5 Intersection, Burnwood | |||
| East Esplanade Old Industrial | East Esplanade Old Industrial, Royal Park | |||
| El Rey Pier | El Rey Pier, El Rey | |||
| Franklin Terrace View | Interstate 6 Intersection, Franklin Terrace | |||
| Ghost Stadium | Millennium Plaza, Royal Park | |||
| Granite Springs Monument | Granite Spring Monument, Crescent Mountains | |||
| Granite Springs View | Weid Canyon, Crescent Mountains | |||
| Harbor View Mall | Harbor View Mall, Franklin Terrace | |||
| Lone Palm Village Crossings | Lone Palm Village, Royal Park | |||
| Millennium Bridge | Millennium Plaza, Royal Park | |||
| Morphus | Morphus, Franklin Terrace | |||
| Navy Pier | 1235 Pier G, South Port | |||
| San Pedro Docks | San Pedro Transfer, South Port | |||
| Shoreline Front Bay | Cross Roads, Burnwood | |||
| Sinner's Peak Observatory | Sinner's Peak Observatory, El Rey | |||
| South Port Bridge | Manches Crest, South Port | |||
| VB Petrochemical Plant | VB Petrochemical Plant, South Port | |||
| Ventura Bay Art Centre | Ventura Bay Art Centre, South Port | |||
| Ventura Bay Ocean View | Sinner's Peak, El Rey | |||
| Ventura Bay Skyline | Los Sol Bridge, Burnwood | |||
| Ventura Downtown | Beckenroll, Burnwood | |||
| Weid Canyon Dam | Weid Canyon Dam, Crescent Mountains | |||
| Weid Canyon River | Weid Canyon, Crescent Mountains | |||
| Need for Speed (2015) | |
|---|---|
| Customisation | Aftermarket Brands · Performance · Tuning · Visual · Wrap Editor |
| Progression | Cars · Driving Icons · Reputation · Ventura Bay · Daily Challenges · Community Events |
| Event Types | Circuit Race · Challenges · Drag Race · Drift Contest · Drift Train · Drift Trial · Gymkhana · Pursuit · Spontaneous Event · Sprint Race · Time Attack · Time Trial · Touge |
| Collectibles | Donut Spots · "Free" Parts · Urbex Spots · Vista Spots |
| Other | Deluxe Edition · Awards · Development · Soundtrack |
| Updates | Update 1 · Icons · Legends · Hot Rods |