No edit summary |
(Undo revision 136531 by We need more marvel (talk)) |
||
| (19 intermediate revisions by 9 users not shown) | |||
| Line 1: | Line 1: | ||
| − | {{Stub}}[[File:NFSRRCPD.png|x64px|right]]'''Redview County Police Department''' ('''RCPD''') is a law enforcement agency featured in [[Need for Speed: Rivals]]. |
+ | {{game|ri = y}}{{Stub}}[[File:NFSRRCPD.png|x64px|right]]'''Redview County Police Department''' ('''RCPD''') is a law enforcement agency featured in ''[[Need for Speed: Rivals]]''. |
| + | {|style="width: 100%; text-align: center" |
||
| ⚫ | |||
| + | |style="width: 33%"|'''Patrol Units''' |
||
| − | {|class="wikitable" style="border: 2px solid #476A81; background: #222222; text-align: center; width: 100%" |
||
| + | |style="width: 33%"|'''Enforcer Units''' |
||
| − | !style="border-bottom: 2px solid #476A81; background: #EAEDF2; border-right: 1px solid transparent; color: #d20611"|'''Image''' |
||
| + | |style="width: 33%"|'''Undercover Units''' |
||
| − | !style="border-bottom: 2px solid #476A81; background: #EAEDF2; border-right: 1px solid transparent; color: #d20611"|'''Make''' |
||
| + | |- |
||
| − | !style="border-bottom: 2px solid #476A81; background: #EAEDF2; border-right: 1px solid transparent; color: #d20611"|'''Rank''' |
||
| + | |[[File:NFSRDodgeChargerSRT8PatrolIcon.png|centre|x72px]] |
||
| − | !style="border-bottom: 2px solid #476A81; background: #EAEDF2; border-right: 1px solid transparent; color: #d20611" colspan="5"|'''Specifications''' |
||
| + | |[[File:NFSRDodgeChargerSRT8EnforcerIcon.png|centre|x72px]] |
||
| + | |[[File:NFSRDodgeChargerSRT8UndercoverIcon.png|centre|x72px]] |
||
| + | |- |
||
| + | |Standard RCPD Police Livery |
||
| + | |Alternative RCPD Police Livery |
||
| + | |Grey Body Colour |
||
| + | |- |
||
| + | |Pursuit Tech |
||
| + | |Pursuit Tech |
||
| + | |Pursuit Tech & Radar Stealth |
||
| + | |- |
||
| + | |Stock Top Speed |
||
| + | |Stock Top Speed |
||
| + | |Stock Top Speed |
||
| + | |- |
||
| + | |High Acceleration |
||
| + | |Low Acceleration |
||
| + | |Low Acceleration |
||
| + | |- |
||
| + | |Low Control Rating |
||
| + | |Low Control Rating |
||
| + | |High Control Rating |
||
| + | |- |
||
| + | |Moderate Strength Rating |
||
| + | |High Strength Rating |
||
| + | |Moderate Strength Rating |
||
| + | |- |
||
| + | |Moderate Durability Rating |
||
| + | |High Durability Rating |
||
| + | |Low Durability Rating |
||
| + | |} |
||
| + | |||
| + | ==Units== |
||
| + | {|class="rivals" style="width: 100%" |
||
| + | !Image |
||
| + | !Make |
||
| + | !Rank |
||
| + | !colspan="5"|Specifications |
||
|- |
|- |
||
<!-- Aston --> |
<!-- Aston --> |
||
| − | {{NFSRVehicle|NFSRAstonMartinOne77PatrolIcon.png|Aston Martin One-77|Aston Martin|One-77|cop|16|8.6|7.9|6.6|9.6|9.3}} |
+ | {{NFSRVehicle|NFSRAstonMartinOne77PatrolIcon.png|Aston Martin One-77|Aston Martin|One-77|cop|16| | |8.6|7.9|6.6|9.6|9.3}} |
| − | {{NFSRVehicle|NFSRAstonMartinOne77EnforcerIcon.png|Aston Martin One-77|Aston Martin|One-77|enf|16|8.6|7.3|6.6|10.0|9.8}} |
+ | {{NFSRVehicle|NFSRAstonMartinOne77EnforcerIcon.png|Aston Martin One-77|Aston Martin|One-77|enf|16| | |8.6|7.3|6.6|10.0|9.8}} |
| − | {{NFSRVehicle|NFSRAstonMartinOne77UndercoverIcon.png|Aston Martin One-77|Aston Martin|One-77|uc|16|8.6|7.3|6.9|9.6|8.8}} |
+ | {{NFSRVehicle|NFSRAstonMartinOne77UndercoverIcon.png|Aston Martin One-77|Aston Martin|One-77|uc|16| | |8.6|7.3|6.9|9.6|8.8}} |
| − | {{NFSRVehicle|NFSRAstonMartinVanquishPatrolIcon.png|Aston Martin Vanquish (2012)|Aston Martin|Vanquish|cop| 1|4.6|7.0|5.5|8.7|8.5}} |
+ | {{NFSRVehicle|NFSRAstonMartinVanquishPatrolIcon.png|Aston Martin Vanquish (2012)|Aston Martin|Vanquish|cop| 1| | |4.6|7.0|5.5|8.7|8.5}} |
| − | {{NFSRVehicle|NFSRAstonMartinVanquishEnforcerIcon.png|Aston Martin Vanquish (2012)|Aston Martin|Vanquish|enf| 1|4.6|6.2|5.5|9.1|9.0}} |
+ | {{NFSRVehicle|NFSRAstonMartinVanquishEnforcerIcon.png|Aston Martin Vanquish (2012)|Aston Martin|Vanquish|enf| 1| | |4.6|6.2|5.5|9.1|9.0}} |
| − | {{NFSRVehicle|NFSRAstonMartinVanquishUndercoverIcon.png|Aston Martin Vanquish (2012)|Aston Martin|Vanquish|uc| 1|4.6|6.2|6.2|8.7|8.0}} |
+ | {{NFSRVehicle|NFSRAstonMartinVanquishUndercoverIcon.png|Aston Martin Vanquish (2012)|Aston Martin|Vanquish|uc| 1| | |4.6|6.2|6.2|8.7|8.0}} |
<!-- Bentley --> |
<!-- Bentley --> |
||
| − | {{NFSRVehicle|NFSRBentleyContinentalGTV8PatrolIcon.png|Bentley Continental GT V8 (2012)|Bentley|Continental GT V8| |
+ | {{NFSRVehicle|NFSRBentleyContinentalGTV8PatrolIcon.png|Bentley Continental GT V8 (2012)|Bentley|Continental GT V8|copow|30| | |5.2|5.8|5.5|9.6|9.3}} |
| − | {{NFSRVehicle|NFSRBentleyContinentalGTV8EnforcerIcon.png|Bentley Continental GT V8 (2012)|Bentley|Continental GT V8| |
+ | {{NFSRVehicle|NFSRBentleyContinentalGTV8EnforcerIcon.png|Bentley Continental GT V8 (2012)|Bentley|Continental GT V8|enfow|40| | |5.2|4.9|5.5|10.0|9.8}} |
| − | {{NFSRVehicle|NFSRBentleyContinentalGTV8UndercoverIcon.png|Bentley Continental GT V8 (2012)|Bentley|Continental GT V8| |
+ | {{NFSRVehicle|NFSRBentleyContinentalGTV8UndercoverIcon.png|Bentley Continental GT V8 (2012)|Bentley|Continental GT V8|ucow|50| | |5.2|4.9|6.5|9.6|8.8}} |
<!-- BMW --> |
<!-- BMW --> |
||
| − | {{NFSRVehicle|NFSRBMWM6PatrolIcon.png|BMW M6 Coupé (F13)|BMW|M6 Coupé|cop| 5|5.3|6.1|5.9|8.4|8.3}} |
+ | {{NFSRVehicle|NFSRBMWM6PatrolIcon.png|BMW M6 Coupé (F13)|BMW|M6 Coupé|cop| 5| | |5.3|6.1|5.9|8.4|8.3}} |
| − | {{NFSRVehicle|NFSRBMWM6EnforcerIcon.png|BMW M6 Coupé (F13)|BMW|M6 Coupé|enf| 5|5.3|5.2|5.9|8.8|8.8}} |
+ | {{NFSRVehicle|NFSRBMWM6EnforcerIcon.png|BMW M6 Coupé (F13)|BMW|M6 Coupé|enf| 5| | |5.3|5.2|5.9|8.8|8.8}} |
| − | {{NFSRVehicle|NFSRBMWM6UndercoverIcon.png|BMW M6 Coupé (F13)|BMW|M6 Coupé|uc| 5|5.3|5.2|6.9|8.4|7.8}} |
+ | {{NFSRVehicle|NFSRBMWM6UndercoverIcon.png|BMW M6 Coupé (F13)|BMW|M6 Coupé|uc| 5| | |5.3|5.2|6.9|8.4|7.8}} |
<!-- Bugatti --> |
<!-- Bugatti --> |
||
| − | {{NFSRVehicle|NFSRBugattiVeyronSuperSportPatrolIcon.png|Bugatti Veyron 16.4 Super Sport|Bugatti|Veyron Super Sport|cop|18|12.7|9.7|7.8|8.7|8.5}} |
+ | {{NFSRVehicle|NFSRBugattiVeyronSuperSportPatrolIcon.png|Bugatti Veyron 16.4 Super Sport|Bugatti|Veyron Super Sport|cop|18| | |12.7|9.7|7.8|8.7|8.5}} |
| − | {{NFSRVehicle|NFSRBugattiVeyronSuperSportEnforcerIcon.png|Bugatti Veyron 16.4 Super Sport|Bugatti|Veyron Super Sport|enf|18|12.7|9.3|7.8|9.1|9.0}} |
+ | {{NFSRVehicle|NFSRBugattiVeyronSuperSportEnforcerIcon.png|Bugatti Veyron 16.4 Super Sport|Bugatti|Veyron Super Sport|enf|18| | |12.7|9.3|7.8|9.1|9.0}} |
| − | {{NFSRVehicle|NFSRBugattiVeyronSuperSportUndercoverIcon.png|Bugatti Veyron 16.4 Super Sport|Bugatti|Veyron Super Sport|uc|18|12.7|9.3|8.0|8.7|8.0}} |
+ | {{NFSRVehicle|NFSRBugattiVeyronSuperSportUndercoverIcon.png|Bugatti Veyron 16.4 Super Sport|Bugatti|Veyron Super Sport|uc|18| | |12.7|9.3|8.0|8.7|8.0}} |
<!-- Chevrolet --> |
<!-- Chevrolet --> |
||
| − | {{NFSRVehicle|NFSRChevroletCamaroZL1PatrolIcon.png|Chevrolet Camaro ZL1 (2012)|Chevrolet|Camaro ZL1|cop| 2|4.7|6.0|6.2|8.9|8.7}} |
+ | {{NFSRVehicle|NFSRChevroletCamaroZL1PatrolIcon.png|Chevrolet Camaro ZL1 (2012)|Chevrolet|Camaro ZL1|cop| 2| | |4.7|6.0|6.2|8.9|8.7}} |
| − | {{NFSRVehicle|NFSRChevroletCamaroZL1EnforcerIcon.png|Chevrolet Camaro ZL1 (2012)|Chevrolet|Camaro ZL1|enf| 2|4.7|5.3|6.2|9.3|9.2}} |
+ | {{NFSRVehicle|NFSRChevroletCamaroZL1EnforcerIcon.png|Chevrolet Camaro ZL1 (2012)|Chevrolet|Camaro ZL1|enf| 2| | |4.7|5.3|6.2|9.3|9.2}} |
| − | {{NFSRVehicle|NFSRChevroletCamaroZL1UndercoverIcon.png|Chevrolet Camaro ZL1 (2012)|Chevrolet|Camaro ZL1|uc| 2|4.7|5.3|6.9|8.9|8.2}} |
+ | {{NFSRVehicle|NFSRChevroletCamaroZL1UndercoverIcon.png|Chevrolet Camaro ZL1 (2012)|Chevrolet|Camaro ZL1|uc| 2| | |4.7|5.3|6.9|8.9|8.2}} |
<!-- Dodge --> |
<!-- Dodge --> |
||
| − | {{NFSRVehicle|NFSRDodgeChargerSRT8PatrolIcon.png|Dodge Charger SRT8 (2012)|Dodge|Charger SRT8|cop| 0|3.8|4.4|3.8|9.8|9.5}} |
+ | {{NFSRVehicle|NFSRDodgeChargerSRT8PatrolIcon.png|Dodge Charger SRT8 (2012)|Dodge|Charger SRT8|cop| 0| | |3.8|4.4|3.8|9.8|9.5}} |
| − | {{NFSRVehicle|NFSRDodgeChargerSRT8EnforcerIcon.png|Dodge Charger SRT8 (2012)|Dodge|Charger SRT8|enf| 0|3.8|3.5|3.8|10.2|10.0}} |
+ | {{NFSRVehicle|NFSRDodgeChargerSRT8EnforcerIcon.png|Dodge Charger SRT8 (2012)|Dodge|Charger SRT8|enf| 0| | |3.8|3.5|3.8|10.2|10.0}} |
| − | {{NFSRVehicle|NFSRDodgeChargerSRT8UndercoverIcon.png|Dodge Charger SRT8 (2012)|Dodge|Charger SRT8|uc| 0|3.8|3.5|4.8|9.8|9.0}} |
+ | {{NFSRVehicle|NFSRDodgeChargerSRT8UndercoverIcon.png|Dodge Charger SRT8 (2012)|Dodge|Charger SRT8|uc| 0| | |3.8|3.5|4.8|9.8|9.0}} |
<!-- Ferrari --> |
<!-- Ferrari --> |
||
| − | {{NFSRVehicle|NFSRFerrari458PatrolIcon.png|Ferrari 458 Italia|Ferrari|458 Italia|cop|10|6.7|7.9|7.5|8.4|8.3}} |
+ | {{NFSRVehicle|NFSRFerrari458PatrolIcon.png|Ferrari 458 Italia|Ferrari|458 Italia|cop|10| | |6.7|7.9|7.5|8.4|8.3}} |
| − | {{NFSRVehicle|NFSRFerrari458EnforcerIcon.png|Ferrari 458 Italia|Ferrari|458 Italia|enf|10|6.7|7.3|7.5|8.8|8.8}} |
+ | {{NFSRVehicle|NFSRFerrari458EnforcerIcon.png|Ferrari 458 Italia|Ferrari|458 Italia|enf|10| | |6.7|7.3|7.5|8.8|8.8}} |
| − | {{NFSRVehicle|NFSRFerrari458UndercoverIcon.png|Ferrari 458 Italia|Ferrari|458 Italia|uc|10|6.7|7.3|7.8|8.4|7.8}} |
+ | {{NFSRVehicle|NFSRFerrari458UndercoverIcon.png|Ferrari 458 Italia|Ferrari|458 Italia|uc|10| | |6.7|7.3|7.8|8.4|7.8}} |
| − | {{NFSRVehicle|NFSRFerrariF40PatrolIcon.png|Ferrari F40|Ferrari|F40|cop| |6.6|6.8|7.0|8.4|8.3}} |
+ | {{NFSRVehicle|NFSRFerrariF40PatrolIcon.png|Ferrari F40|Ferrari|F40|cop| | | |6.6|6.8|7.0|8.4|8.3}} |
| − | {{NFSRVehicle|NFSRFerrariF40EnforcerIcon.png|Ferrari F40|Ferrari|F40|enf| |6.6|6.2|7.0|8.8|8.8}} |
+ | {{NFSRVehicle|NFSRFerrariF40EnforcerIcon.png|Ferrari F40|Ferrari|F40|enf| | | |6.6|6.2|7.0|8.8|8.8}} |
| − | {{NFSRVehicle|NFSRFerrariF40UndercoverIcon.png|Ferrari F40|Ferrari|F40|uc| |6.6|6.2|7.3|8.4|7.8}} |
+ | {{NFSRVehicle|NFSRFerrariF40UndercoverIcon.png|Ferrari F40|Ferrari|F40|uc| | | |6.6|6.2|7.3|8.4|7.8}} |
| − | {{NFSRVehicle|NFSRFerrariF50PatrolIcon.png|Ferrari F50|Ferrari|F50|cop| |6.7|7.9|7.4|7.8|7.7}} |
+ | {{NFSRVehicle|NFSRFerrariF50PatrolIcon.png|Ferrari F50|Ferrari|F50|cop| | | |6.7|7.9|7.4|7.8|7.7}} |
| − | {{NFSRVehicle|NFSRFerrariF50EnforcerIcon.png|Ferrari F50|Ferrari|F50|enf| |6.7|7.3|7.4|8.2|8.2}} |
+ | {{NFSRVehicle|NFSRFerrariF50EnforcerIcon.png|Ferrari F50|Ferrari|F50|enf| | | |6.7|7.3|7.4|8.2|8.2}} |
| − | {{NFSRVehicle|NFSRFerrariF50UndercoverIcon.png|Ferrari F50|Ferrari|F50|uc| |6.7|7.3|7.7|7.8|7.2}} |
+ | {{NFSRVehicle|NFSRFerrariF50UndercoverIcon.png|Ferrari F50|Ferrari|F50|uc| | | |6.7|7.3|7.7|7.8|7.2}} |
| − | {{NFSRVehicle|NFSRFerrariFFPatrolIcon.png|Ferrari FF|Ferrari|FF|cop|13|7.3|7.6|7.1|9.6|9.6}} |
+ | {{NFSRVehicle|NFSRFerrariFFPatrolIcon.png|Ferrari FF|Ferrari|FF|cop|13| | |7.3|7.6|7.1|9.6|9.6}} |
| − | {{NFSRVehicle|NFSRFerrariFFEnforcerIcon.png|Ferrari FF|Ferrari|FF|enf|13|7.3|6.9|7.1|10.0|9.8}} |
+ | {{NFSRVehicle|NFSRFerrariFFEnforcerIcon.png|Ferrari FF|Ferrari|FF|enf|13| | |7.3|6.9|7.1|10.0|9.8}} |
| − | {{NFSRVehicle|NFSRFerrariFFUndercoverIcon.png|Ferrari FF|Ferrari|FF|uc|13|7.3|6.9|7.8|9.6|8.8}} |
+ | {{NFSRVehicle|NFSRFerrariFFUndercoverIcon.png|Ferrari FF|Ferrari|FF|uc|13| | |7.3|6.9|7.8|9.6|8.8}} |
<!-- Ford Shelby --> |
<!-- Ford Shelby --> |
||
| − | {{NFSRVehicle|NFSRFordShelbyGT500PatrolIcon.png|Ford Shelby GT500 (2013)|Ford |
+ | {{NFSRVehicle|NFSRFordShelbyGT500PatrolIcon.png|Ford Shelby GT500 (2013)|Ford|Shelby GT500|cop| 4| | |6.7|4.8|3.3|8.9|8.7}} |
| − | {{NFSRVehicle|NFSRFordShelbyGT500EnforcerIcon.png|Ford Shelby GT500 (2013)|Ford |
+ | {{NFSRVehicle|NFSRFordShelbyGT500EnforcerIcon.png|Ford Shelby GT500 (2013)|Ford|Shelby GT500|enf| 4| | |6.7|3.9|3.3|9.3|9.2}} |
| − | {{NFSRVehicle|NFSRFordShelbyGT500UNdercoverIcon.png|Ford Shelby GT500 (2013)|Ford |
+ | {{NFSRVehicle|NFSRFordShelbyGT500UNdercoverIcon.png|Ford Shelby GT500 (2013)|Ford|Shelby GT500|uc| 4| | |6.7|3.9|4.3|8.9|8.2}} |
<!-- GTA --> |
<!-- GTA --> |
||
| − | {{NFSRVehicle| |
+ | {{NFSRVehicle|NFSRGTASpanoPatrolIcon.png|GTA Spano|GTA|Spano|cop| | | |8.4|7.7|6.9|7.6|7.5}} |
| − | {{NFSRVehicle| |
+ | {{NFSRVehicle|NFSRGTASpanoEnforcerIcon.png|GTA Spano|GTA|Spano|enf| | | |8.4|7.1|6.9|8.0|8.0}} |
| − | {{NFSRVehicle| |
+ | {{NFSRVehicle|NFSRGTASpanoUndercoverIcon.png|GTA Spano|GTA|Spano|uc| | | |8.4|7.1|7.2|7.6|7.0}} |
<!-- Hennessey --> |
<!-- Hennessey --> |
||
| − | {{NFSRVehicle|NFSRHennesseyVenomGTPatrolIcon.png|Hennessey Venom GT (2012)|Hennessey|Venom GT|cop|20|14.8|9.7|7.5|7.3|7.3}} |
+ | {{NFSRVehicle|NFSRHennesseyVenomGTPatrolIcon.png|Hennessey Venom GT (2012)|Hennessey|Venom GT|cop|20| | |14.8|9.7|7.5|7.3|7.3}} |
| − | {{NFSRVehicle|NFSRHennesseyVenomGTEnforcerIcon.png|Hennessey Venom GT (2012)|Hennessey|Venom GT|enf|20|14.8|9.3|7.5|7.7|7.8}} |
+ | {{NFSRVehicle|NFSRHennesseyVenomGTEnforcerIcon.png|Hennessey Venom GT (2012)|Hennessey|Venom GT|enf|20| | |14.8|9.3|7.5|7.7|7.8}} |
| − | {{NFSRVehicle|NFSRHennesseyVenomGTUndercoverIcon.png|Hennessey Venom GT (2012)|Hennessey|Venom GT|uc|20|14.8|9.3|7.7|7.3|6.8}} |
+ | {{NFSRVehicle|NFSRHennesseyVenomGTUndercoverIcon.png|Hennessey Venom GT (2012)|Hennessey|Venom GT|uc|20| | |14.8|9.3|7.7|7.3|6.8}} |
<!-- Jaguar --> |
<!-- Jaguar --> |
||
| − | {{NFSRVehicle|NFSRJaguarCX75PatrolIcon.png|Jaguar C-X75 Prototype|Jaguar|C-X75 Prototype|cop| |8.6|9.3|8.3|9.8|9.5}} |
+ | {{NFSRVehicle|NFSRJaguarCX75PatrolIcon.png|Jaguar C-X75 Prototype|Jaguar|C-X75 Prototype|cop| | | |8.6|9.3|8.3|9.8|9.5}} |
| − | {{NFSRVehicle|NFSRJaguarCX75EnforcerIcon.png|Jaguar C-X75 Prototype|Jaguar|C-X75 Prototype|enf| |8.6|8.8|8.3|10.2|10.0}} |
+ | {{NFSRVehicle|NFSRJaguarCX75EnforcerIcon.png|Jaguar C-X75 Prototype|Jaguar|C-X75 Prototype|enf| | | |8.6|8.8|8.3|10.2|10.0}} |
| − | {{NFSRVehicle|NFSRJaguarCX75UndercoverIcon.png|Jaguar C-X75 Prototype|Jaguar|C-X75 Prototype|uc| |8.6|8.8|8.5|9.8|9.0}} |
+ | {{NFSRVehicle|NFSRJaguarCX75UndercoverIcon.png|Jaguar C-X75 Prototype|Jaguar|C-X75 Prototype|uc| | | |8.6|8.8|8.5|9.8|9.0}} |
| − | {{NFSRVehicle|NFSRJaguarXJ220PatrolIcon.png|Jaguar XJ220|Jaguar|XJ220|cop| |7.8|6.9|6.6|9.8|9.5}} |
+ | {{NFSRVehicle|NFSRJaguarXJ220PatrolIcon.png|Jaguar XJ220|Jaguar|XJ220|cop| | | |7.8|6.9|6.6|9.8|9.5}} |
| − | {{NFSRVehicle|NFSRJaguarXJ220EnforcerIcon.png|Jaguar XJ220|Jaguar|XJ220|enf| |7.8|6.3|6.6|10.2|10.0}} |
+ | {{NFSRVehicle|NFSRJaguarXJ220EnforcerIcon.png|Jaguar XJ220|Jaguar|XJ220|enf| | | |7.8|6.3|6.6|10.2|10.0}} |
| − | {{NFSRVehicle|NFSRJaguarXJ220UndercoverIcon.png|Jaguar XJ220|Jaguar|XJ220|uc| |7.8|6.3|6.9|9.8|9.0}} |
+ | {{NFSRVehicle|NFSRJaguarXJ220UndercoverIcon.png|Jaguar XJ220|Jaguar|XJ220|uc| | | |7.8|6.3|6.9|9.8|9.0}} |
<!-- Koenigsegg --> |
<!-- Koenigsegg --> |
||
| − | {{NFSRVehicle|NFSRKoenigseggAgeraRPatrolIcon.png|Koenigsegg Agera R (2013)|Koenigsegg|Agera R|cop|19|14.3|9.4|7.1|7.6|7.5}} |
+ | {{NFSRVehicle|NFSRKoenigseggAgeraRPatrolIcon.png|Koenigsegg Agera R (2013)|Koenigsegg|Agera R|cop|19| | |14.3|9.4|7.1|7.6|7.5}} |
| − | {{NFSRVehicle|NFSRKoenigseggAgeraREnforcerIcon.png|Koenigsegg Agera R (2013)|Koenigsegg|Agera R|enf|19|14.3|9.0|7.1|8.0|8.0}} |
+ | {{NFSRVehicle|NFSRKoenigseggAgeraREnforcerIcon.png|Koenigsegg Agera R (2013)|Koenigsegg|Agera R|enf|19| | |14.3|9.0|7.1|8.0|8.0}} |
| − | {{NFSRVehicle|NFSRKoenigseggAgeraRUndercoverIcon.png|Koenigsegg Agera R (2013)|Koenigsegg|Agera R|uc|19|14.3|9.0|7.3|7.6|7.0}} |
+ | {{NFSRVehicle|NFSRKoenigseggAgeraRUndercoverIcon.png|Koenigsegg Agera R (2013)|Koenigsegg|Agera R|uc|19| | |14.3|9.0|7.3|7.6|7.0}} |
| − | {{NFSRVehicle| |
+ | {{NFSRVehicle|NFSRKoenigseggOnePatrolIcon.png|Koenigsegg One:1|Koenigsegg|One:1|cop|21| | |15.0|10.1|6.9|7.3|7.3}} |
| − | {{NFSRVehicle| |
+ | {{NFSRVehicle|NFSRKoenigseggOneEnforcerIcon.png|Koenigsegg One:1|Koenigsegg|One:1|enf|21| | |15.0|9.6|6.9|7.7|7.8}} |
| − | {{NFSRVehicle| |
+ | {{NFSRVehicle|NFSRKoenigseggOneUndercoverIcon.png|Koenigsegg One:1|Koenigsegg|One:1|uc|21| | |15.0|9.6|7.1|7.3|6.8}} |
<!-- Lamborghini --> |
<!-- Lamborghini --> |
||
| − | {{NFSRVehicle|NFSRLamborghiniAventadorPatrolIcon.png|Lamborghini Aventador LP 700-4|Lamborghini|Aventador LP 700-4|cop|15|8.3|10.1|8.3|9.8|9.5}} |
+ | {{NFSRVehicle|NFSRLamborghiniAventadorPatrolIcon.png|Lamborghini Aventador LP 700-4|Lamborghini|Aventador LP 700-4|cop|15| | |8.3|10.1|8.3|9.8|9.5}} |
| − | {{NFSRVehicle|NFSRLamborghiniAventadorEnforcerIcon.png|Lamborghini Aventador LP 700-4|Lamborghini|Aventador LP 700-4|enf|15|8.3|9.6|8.3|10.2|10.0}} |
+ | {{NFSRVehicle|NFSRLamborghiniAventadorEnforcerIcon.png|Lamborghini Aventador LP 700-4|Lamborghini|Aventador LP 700-4|enf|15| | |8.3|9.6|8.3|10.2|10.0}} |
| − | {{NFSRVehicle|NFSRLamborghiniAventadorUndercoverIcon.png|Lamborghini Aventador LP 700-4|Lamborghini|Aventador LP 700-4|uc|15|8.3|9.6|8.5|9.8|9.0}} |
+ | {{NFSRVehicle|NFSRLamborghiniAventadorUndercoverIcon.png|Lamborghini Aventador LP 700-4|Lamborghini|Aventador LP 700-4|uc|15| | |8.3|9.6|8.5|9.8|9.0}} |
| − | {{NFSRVehicle|NFSRLamborghiniGallardoPatrolIcon.png|Lamborghini Gallardo LP 560-4 (2013)|Lamborghini|Gallardo LP 560-4|cop| 8|6.7|7.4|6.7|8.4|8.3}} |
+ | {{NFSRVehicle|NFSRLamborghiniGallardoPatrolIcon.png|Lamborghini Gallardo LP 560-4 (2013)|Lamborghini|Gallardo LP 560-4|cop| 8| | |6.7|7.4|6.7|8.4|8.3}} |
| − | {{NFSRVehicle|NFSRLamborghiniGallardoEnforcerIcon.png|Lamborghini Gallardo LP 560-4 (2013)|Lamborghini|Gallardo LP 560-4|enf| 8|6.7|6.6|6.7|8.8|8.8}} |
+ | {{NFSRVehicle|NFSRLamborghiniGallardoEnforcerIcon.png|Lamborghini Gallardo LP 560-4 (2013)|Lamborghini|Gallardo LP 560-4|enf| 8| | |6.7|6.6|6.7|8.8|8.8}} |
| − | {{NFSRVehicle|NFSRLamborghiniGallardoUndercoverIcon.png|Lamborghini Gallardo LP 560-4 (2013)|Lamborghini|Gallardo LP 560-4|uc| 8|6.7|6.6|7.4|8.4|7.8}} |
+ | {{NFSRVehicle|NFSRLamborghiniGallardoUndercoverIcon.png|Lamborghini Gallardo LP 560-4 (2013)|Lamborghini|Gallardo LP 560-4|uc| 8| | |6.7|6.6|7.4|8.4|7.8}} |
| − | {{NFSRVehicle| |
+ | {{NFSRVehicle|NFSRLamborghiniGallardoSuperTrofeoPatrolIcon.png|Lamborghini Gallardo LP 570-4 Super Trofeo|Lamborghini|Gallardo Super Trofeo|cop| | | |6.7|7.4|6.6|8.4|8.2}} |
| − | {{NFSRVehicle| |
+ | {{NFSRVehicle|NFSRLamborghiniGallardoSuperTrofeoEnforcerIcon.png|Lamborghini Gallardo LP 570-4 Super Trofeo|Lamborghini|Gallardo Super Trofeo|enf| | | |6.7|6.7|6.6|8.8|8.7}} |
| − | {{NFSRVehicle| |
+ | {{NFSRVehicle|NFSRLamborghiniGallardoSuperTrofeoUndercoverIcon.png|Lamborghini Gallardo LP 570-4 Super Trofeo|Lamborghini|Gallardo Super Trofeo|uc| | | |6.7|6.7|7.3|8.4|7.7}} |
| − | {{NFSRVehicle| |
+ | {{NFSRVehicle|NFSRLamborghiniMiuraConceptPatrolIcon.png|Lamborghini Miura (Concept)|Lamborghini|Miura Concept|cop| | | |7.5|7.7|7.0|8.4|8.3}} |
| − | {{NFSRVehicle| |
+ | {{NFSRVehicle|NFSRLamborghiniMiuraConceptEnforcerIcon.png|Lamborghini Miura (Concept)|Lamborghini|Miura Concept|enf| | | |7.5|7.1|7.0|8.8|8.8}} |
| − | {{NFSRVehicle| |
+ | {{NFSRVehicle|NFSRLamborghiniMiuraConceptUndercoverIcon.png|Lamborghini Miura (Concept)|Lamborghini|Miura Concept|uc| | | |7.5|7.1|7.3|8.4|7.8}} |
| − | {{NFSRVehicle| |
+ | {{NFSRVehicle|NFSRLamborghiniMurcielargoPatrolIcon.png|Lamborghini Murciélago LP 670-4 SV|Lamborghini|Murciélago LP 670-4|cop|14| | |7.7|7.7|8.4|8.7|8.5}} |
| − | {{NFSRVehicle| |
+ | {{NFSRVehicle|NFSRLamborghiniMurcielargoEnforcerIcon.png|Lamborghini Murciélago LP 670-4 SV|Lamborghini|Murciélago LP 670-4|enf|14| | |7.7|7.1|8.4|9.1|9.0}} |
| − | {{NFSRVehicle| |
+ | {{NFSRVehicle|NFSRLamborghiniMurcielargoUndercoverIcon.png|Lamborghini Murciélago LP 670-4 SV|Lamborghini|Murciélago LP 670-4|uc|14| | |7.7|7.1|8.7|8.7|8.0}} |
| − | {{NFSRVehicle| |
+ | {{NFSRVehicle|NFSRLamborghiniSestoElementoPatrolIcon.png|Lamborghini Sesto Elemento|Lamborghini|Sesto Elemento|cop| | | |8.3|9.6|8.0|9.8|9.5}} |
| − | {{NFSRVehicle| |
+ | {{NFSRVehicle|NFSRLamborghiniSestoElementoEnforcerIcon.png|Lamborghini Sesto Elemento|Lamborghini|Sesto Elemento|enf| | | |8.3|9.1|8.0|10.2|10.0}} |
| − | {{NFSRVehicle| |
+ | {{NFSRVehicle|NFSRLamborghiniSestoElementoUndercoverIcon.png|Lamborghini Sesto Elemento|Lamborghini|Sesto Elemento|uc| | | |8.3|9.1|8.2|9.8|9.0}} |
<!-- Lexus --> |
<!-- Lexus --> |
||
| − | {{NFSRVehicle|NFSRLexusLFAPatrolIcon.png|Lexus LFA|Lexus|LFA|cop| 9|6.7|6.8|7.0|7.3|7.3}} |
+ | {{NFSRVehicle|NFSRLexusLFAPatrolIcon.png|Lexus LFA|Lexus|LFA|cop| 9| | |6.7|6.8|7.0|7.3|7.3}} |
| − | {{NFSRVehicle|NFSRLexusLFAEnforcerIcon.png|Lexus LFA|Lexus|LFA|enf| 9|6.7|6.0|7.0|7.7|7.8}} |
+ | {{NFSRVehicle|NFSRLexusLFAEnforcerIcon.png|Lexus LFA|Lexus|LFA|enf| 9| | |6.7|6.0|7.0|7.7|7.8}} |
| − | {{NFSRVehicle|NFSRLexusLFAUndercoverIcon.png|Lexus LFA|Lexus|LFA|uc| 9|6.7|6.0|7.7|7.3|6.8}} |
+ | {{NFSRVehicle|NFSRLexusLFAUndercoverIcon.png|Lexus LFA|Lexus|LFA|uc| 9| | |6.7|6.0|7.7|7.3|6.8}} |
<!-- Marussia --> |
<!-- Marussia --> |
||
| − | {{NFSRVehicle|NFSRMarussiaB2PatrolIcon.png|Marussia B2|Marussia|B2|cop| 3|4.9|6.6|5.8|7.6|7.5}} |
+ | {{NFSRVehicle|NFSRMarussiaB2PatrolIcon.png|Marussia B2|Marussia|B2|cop| 3| | |4.9|6.6|5.8|7.6|7.5}} |
| − | {{NFSRVehicle|NFSRMarussiaB2EnforcerIcon.png|Marussia B2|Marussia|B2|enf| 3|4.9|5.7|5.8|8.0|8.0}} |
+ | {{NFSRVehicle|NFSRMarussiaB2EnforcerIcon.png|Marussia B2|Marussia|B2|enf| 3| | |4.9|5.7|5.8|8.0|8.0}} |
| − | {{NFSRVehicle|NFSRMarussiaB2UndercoverIcon.png|Marussia B2|Marussia|B2|uc| 3|4.9|5.7|6.8|7.6|7.0}} |
+ | {{NFSRVehicle|NFSRMarussiaB2UndercoverIcon.png|Marussia B2|Marussia|B2|uc| 3| | |4.9|5.7|6.8|7.6|7.0}} |
<!-- McLaren --> |
<!-- McLaren --> |
||
| − | {{NFSRVehicle|NFSRMcLarenMP412CPatrolIcon.png|McLaren MP4-12C (2013)|McLaren|12C|cop|12|7.2|8.3|7.6|8.7|8.5}} |
+ | {{NFSRVehicle|NFSRMcLarenMP412CPatrolIcon.png|McLaren MP4-12C (2013)|McLaren|12C|cop|12| | |7.2|8.3|7.6|8.7|8.5}} |
| − | {{NFSRVehicle|NFSRMcLarenMP412CEnforcerIcon.png|McLaren MP4-12C (2013)|McLaren|12C|enf|12|7.2|7.7|7.6|9.1|9.0}} |
+ | {{NFSRVehicle|NFSRMcLarenMP412CEnforcerIcon.png|McLaren MP4-12C (2013)|McLaren|12C|enf|12| | |7.2|7.7|7.6|9.1|9.0}} |
| − | {{NFSRVehicle|NFSRMcLarenMP412CUndercoverIcon.png|McLaren MP4-12C (2013)|McLaren|12C|uc|12|7.2|7.7|7.9|8.7|8.0}} |
+ | {{NFSRVehicle|NFSRMcLarenMP412CUndercoverIcon.png|McLaren MP4-12C (2013)|McLaren|12C|uc|12| | |7.2|7.7|7.9|8.7|8.0}} |
| − | {{NFSRVehicle|NFSRMcLarenF1LMPatrolIcon.png|McLaren F1 LM|McLaren|F1 LM|cop|17|9.1|8.3|7.9|7.3|7.3}} |
+ | {{NFSRVehicle|NFSRMcLarenF1LMPatrolIcon.png|McLaren F1 LM|McLaren|F1 LM|cop|17| | |9.1|8.3|7.9|7.3|7.3}} |
| − | {{NFSRVehicle|NFSRMcLarenF1LMEnforcerIcon.png|McLaren F1 LM|McLaren|F1 LM|enf|17|9.1|7.7|7.9|7.7|7.8}} |
+ | {{NFSRVehicle|NFSRMcLarenF1LMEnforcerIcon.png|McLaren F1 LM|McLaren|F1 LM|enf|17| | |9.1|7.7|7.9|7.7|7.8}} |
| − | {{NFSRVehicle|NFSRMcLarenF1LMUndercoverIcon.png|McLaren F1 LM|McLaren|F1 LM|uc|17|9.1|7.7|8.2|7.3|6.8}} |
+ | {{NFSRVehicle|NFSRMcLarenF1LMUndercoverIcon.png|McLaren F1 LM|McLaren|F1 LM|uc|17| | |9.1|7.7|8.2|7.3|6.8}} |
<!-- Mercedes-Benz --> |
<!-- Mercedes-Benz --> |
||
| − | {{NFSRVehicle|NFSRMercedesC63PatrolIcon.png|Mercedes-Benz_C63_AMG_Coupé_Black_Series|Mercedes|C 63 AMG Coupé Black Series|cop| 0|3.7|7.0|6.4|9.8|9.5}} |
+ | {{NFSRVehicle|NFSRMercedesC63PatrolIcon.png|Mercedes-Benz_C63_AMG_Coupé_Black_Series|Mercedes|C 63 AMG Coupé Black Series|cop| 0| | |3.7|7.0|6.4|9.8|9.5}} |
| − | {{NFSRVehicle|NFSRMercedesC63EnforcerIcon.png|Mercedes-Benz_C63_AMG_Coupé_Black_Series|Mercedes|C 63 AMG Coupé Black Series|enf| 0|3.7|6.2|6.4|10.2|10.0}} |
+ | {{NFSRVehicle|NFSRMercedesC63EnforcerIcon.png|Mercedes-Benz_C63_AMG_Coupé_Black_Series|Mercedes|C 63 AMG Coupé Black Series|enf| 0| | |3.7|6.2|6.4|10.2|10.0}} |
| − | {{NFSRVehicle|NFSRMercedesC63UndercoverIcon.png|Mercedes-Benz_C63_AMG_Coupé_Black_Series|Mercedes|C 63 AMG Coupé Black Series|uc| 0|3.7|6.2|7.1|9.8|9.0}} |
+ | {{NFSRVehicle|NFSRMercedesC63UndercoverIcon.png|Mercedes-Benz_C63_AMG_Coupé_Black_Series|Mercedes|C 63 AMG Coupé Black Series|uc| 0| | |3.7|6.2|7.1|9.8|9.0}} |
| ⚫ | |||
| − | <!-- Mercedes-Benz McLaren --> |
||
| − | {{NFSRVehicle| |
+ | {{NFSRVehicle|NFSRMerecedesMcLarenSLR722EnforcerIcon.png|Mercedes-Benz SLR McLaren 722 Edition|Mercedes|McLaren SLR|enf| | | |7.4|5.8|5.2|8.0|8.0}} |
| − | {{NFSRVehicle| |
+ | {{NFSRVehicle|NFSRMerecedesMcLarenSLR722UndercoverIcon.png|Mercedes-Benz SLR McLaren 722 Edition|Mercedes|McLaren SLR|uc| | | |7.4|5.8|5.9|7.6|7.0}} |
| ⚫ | |||
<!-- Nissan --> |
<!-- Nissan --> |
||
| − | {{NFSRVehicle|NFSRNissanGTRPatrolIcon.png|Nissan GT-R Black Edition|Nissan|GT-R Black Edition|cop| |6.0|8.2|8.5|9.8|9.5}} |
+ | {{NFSRVehicle|NFSRNissanGTRPatrolIcon.png|Nissan GT-R Black Edition|Nissan|GT-R Black Edition|cop| | | |6.0|8.2|8.5|9.8|9.5}} |
| − | {{NFSRVehicle|NFSRNissanGTRUltimateIcon.png|Nissan GT-R Black Edition|Nissan|GT-R Black Edition - Ultimate|cop| |6.0|8.2|8.5|9.8|9.5}} |
+ | {{NFSRVehicle|NFSRNissanGTRUltimateIcon.png|Nissan GT-R Black Edition|Nissan|GT-R Black Edition - Ultimate|cop| | | |6.0|8.2|8.5|9.8|9.5}} |
| − | {{NFSRVehicle|NFSRNissanGTREnforcerIcon.png|Nissan GT-R Black Edition|Nissan|GT-R Black Edition|enf| |6.0|7.6|8.5|10.2|10.0}} |
+ | {{NFSRVehicle|NFSRNissanGTREnforcerIcon.png|Nissan GT-R Black Edition|Nissan|GT-R Black Edition|enf| | | |6.0|7.6|8.5|10.2|10.0}} |
| − | {{NFSRVehicle|NFSRNissanGTRUndercoverIcon.png|Nissan GT-R Black Edition|Nissan|GT-R Black Edition|uc| |6.0|7.6|8.8|9.8|9.0}} |
+ | {{NFSRVehicle|NFSRNissanGTRUndercoverIcon.png|Nissan GT-R Black Edition|Nissan|GT-R Black Edition|uc| | | |6.0|7.6|8.8|9.8|9.0}} |
<!-- Porsche --> |
<!-- Porsche --> |
||
| − | {{NFSRVehicle|NFSRPorsche911TurboPatrolIcon.png|Porsche 911 Turbo (991)|Porsche|911 Turbo|cop| 6|5.9|7.5|5.2|7.8|7.7}} |
+ | {{NFSRVehicle|NFSRPorsche911TurboPatrolIcon.png|Porsche 911 Turbo (991)|Porsche|911 Turbo|cop| 6| | |5.9|7.5|5.2|7.8|7.7}} |
| − | {{NFSRVehicle|NFSRPorsche911TurboEnforcerIcon.png|Porsche 911 Turbo (991)|Porsche|911 Turbo|enf| 6|5.9|6.8|5.2|8.2|8.2}} |
+ | {{NFSRVehicle|NFSRPorsche911TurboEnforcerIcon.png|Porsche 911 Turbo (991)|Porsche|911 Turbo|enf| 6| | |5.9|6.8|5.2|8.2|8.2}} |
| − | {{NFSRVehicle|NFSRPorsche911TurboUndercoverIcon.png|Porsche 911 Turbo (991)|Porsche|911 Turbo|uc| 6|5.9|6.8|5.9|7.8|7.2}} |
+ | {{NFSRVehicle|NFSRPorsche911TurboUndercoverIcon.png|Porsche 911 Turbo (991)|Porsche|911 Turbo|uc| 6| | |5.9|6.8|5.9|7.8|7.2}} |
| − | {{NFSRVehicle|NFSRPorscheCarreraGTPatrolIcon.png|Porsche Carrera GT|Porsche|Carrera GT|cop|11|7.0|7.7|7.3|7.8|7.7}} |
+ | {{NFSRVehicle|NFSRPorscheCarreraGTPatrolIcon.png|Porsche Carrera GT|Porsche|Carrera GT|cop|11| | |7.0|7.7|7.3|7.8|7.7}} |
| − | {{NFSRVehicle|NFSRPorscheCarreraGTEnforcerIcon.png|Porsche Carrera GT|Porsche|Carrera GT|enf|11|7.0|7.1|7.3|8.2|8.2}} |
+ | {{NFSRVehicle|NFSRPorscheCarreraGTEnforcerIcon.png|Porsche Carrera GT|Porsche|Carrera GT|enf|11| | |7.0|7.1|7.3|8.2|8.2}} |
| − | {{NFSRVehicle|NFSRPorscheCarreraGTUndercoverIcon.png|Porsche Carrera GT|Porsche|Carrera GT|uc|11|7.0|7.1|7.6|7.8|7.2}} |
+ | {{NFSRVehicle|NFSRPorscheCarreraGTUndercoverIcon.png|Porsche Carrera GT|Porsche|Carrera GT|uc|11| | |7.0|7.1|7.6|7.8|7.2}} |
<!-- SRT --> |
<!-- SRT --> |
||
| − | {{NFSRVehicle|NFSRSRTViperGTSPatrolIcon.png|SRT Viper GTS|SRT|Viper GTS|cop| 7|6.7|6.1|5.8|7.8|7.7}} |
+ | {{NFSRVehicle|NFSRSRTViperGTSPatrolIcon.png|SRT Viper GTS|SRT|Viper GTS|cop| 7| | |6.7|6.1|5.8|7.8|7.7}} |
| − | {{NFSRVehicle|NFSRSRTViperGTSEnforcerIcon.png|SRT Viper GTS|SRT|Viper GTS|enf| 7|6.7|5.2|5.8|8.2|8.2}} |
+ | {{NFSRVehicle|NFSRSRTViperGTSEnforcerIcon.png|SRT Viper GTS|SRT|Viper GTS|enf| 7| | |6.7|5.2|5.8|8.2|8.2}} |
| − | {{NFSRVehicle|NFSRSRTViperGTSUndercoverIcon.png|SRT Viper GTS|SRT|Viper GTS|uc| 7|6.7|5.2|6.8|7.8|7.2}} |
+ | {{NFSRVehicle|NFSRSRTViperGTSUndercoverIcon.png|SRT Viper GTS|SRT|Viper GTS|uc| 7| | |6.7|5.2|6.8|7.8|7.2}} |
|} |
|} |
||
| + | |||
| ⚫ | |||
| + | {|class="rivals" style="width: 100%" |
||
| + | !Image |
||
| + | !Make |
||
| + | !Rank |
||
| + | !colspan="5"|Specifications |
||
| + | |- |
||
| + | {{NFSRVehicle|NFSRFerrariEnzoIcon.png|Ferrari Enzo|Ferrari|Enzo Ferrari|impound|10| | |8.4|8.1|7.9|10.2|10.0}} |
||
| + | |} |
||
| + | |||
| + | {{PursuitNav}} |
||
[[Category:Need for Speed: Rivals]] |
[[Category:Need for Speed: Rivals]] |
||
[[Category:Police Departments]] |
[[Category:Police Departments]] |
||
Revision as of 21:36, 21 January 2020
Stub - Why not help by expanding this article with relevant information.

Redview County Police Department (RCPD) is a law enforcement agency featured in Need for Speed: Rivals.
| Patrol Units | Enforcer Units | Undercover Units |
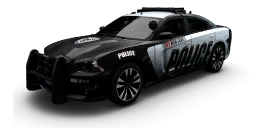 |
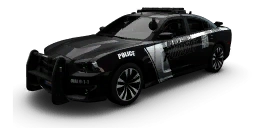 |
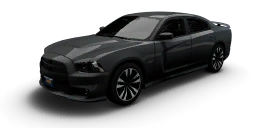 |
| Standard RCPD Police Livery | Alternative RCPD Police Livery | Grey Body Colour |
| Pursuit Tech | Pursuit Tech | Pursuit Tech & Radar Stealth |
| Stock Top Speed | Stock Top Speed | Stock Top Speed |
| High Acceleration | Low Acceleration | Low Acceleration |
| Low Control Rating | Low Control Rating | High Control Rating |
| Moderate Strength Rating | High Strength Rating | Moderate Strength Rating |
| Moderate Durability Rating | High Durability Rating | Low Durability Rating |
Units
| Image | Make | Rank | Specifications | ||||
|---|---|---|---|---|---|---|---|
Top Speed
Acceleration 8.6
Control 7.9
Strength 6.6
Durability 9.6
| |||||||
Top Speed
Acceleration 8.6
Control 7.3
Strength 6.6
Durability 10.0
| |||||||
Top Speed
Acceleration 8.6
Control 7.3
Strength 6.9
Durability 9.6
| |||||||
Top Speed
Acceleration 4.6
Control 7.0
Strength 5.5
Durability 8.7
| |||||||
Top Speed
Acceleration 4.6
Control 6.2
Strength 5.5
Durability 9.1
| |||||||
Top Speed
Acceleration 4.6
Control 6.2
Strength 6.2
Durability 8.7
| |||||||
Top Speed
Acceleration 5.2
Control 5.8
Strength 5.5
Durability 9.6
| |||||||
Top Speed
Acceleration 5.2
Control 4.9
Strength 5.5
Durability 10.0
| |||||||
Top Speed
Acceleration 5.2
Control 4.9
Strength 6.5
Durability 9.6
| |||||||
Top Speed
Acceleration 5.3
Control 6.1
Strength 5.9
Durability 8.4
| |||||||
Top Speed
Acceleration 5.3
Control 5.2
Strength 5.9
Durability 8.8
| |||||||
Top Speed
Acceleration 5.3
Control 5.2
Strength 6.9
Durability 8.4
| |||||||
Top Speed
Acceleration 12.7
Control 9.7
Strength 7.8
Durability 8.7
| |||||||
Top Speed
Acceleration 12.7
Control 9.3
Strength 7.8
Durability 9.1
| |||||||
Top Speed
Acceleration 12.7
Control 9.3
Strength 8.0
Durability 8.7
| |||||||
Top Speed
Acceleration 4.7
Control 6.0
Strength 6.2
Durability 8.9
| |||||||
Top Speed
Acceleration 4.7
Control 5.3
Strength 6.2
Durability 9.3
| |||||||
Top Speed
Acceleration 4.7
Control 5.3
Strength 6.9
Durability 8.9
| |||||||
Top Speed
Acceleration 3.8
Control 4.4
Strength 3.8
Durability 9.8
| |||||||
Top Speed
Acceleration 3.8
Control 3.5
Strength 3.8
Durability 10.2
| |||||||
Top Speed
Acceleration 3.8
Control 3.5
Strength 4.8
Durability 9.8
| |||||||
Top Speed
Acceleration 6.7
Control 7.9
Strength 7.5
Durability 8.4
| |||||||
Top Speed
Acceleration 6.7
Control 7.3
Strength 7.5
Durability 8.8
| |||||||
Top Speed
Acceleration 6.7
Control 7.3
Strength 7.8
Durability 8.4
| |||||||
Top Speed
Acceleration 6.6
Control 6.8
Strength 7.0
Durability 8.4
| |||||||
Top Speed
Acceleration 6.6
Control 6.2
Strength 7.0
Durability 8.8
| |||||||
Top Speed
Acceleration 6.6
Control 6.2
Strength 7.3
Durability 8.4
| |||||||
Top Speed
Acceleration 6.7
Control 7.9
Strength 7.4
Durability 7.8
| |||||||
Top Speed
Acceleration 6.7
Control 7.3
Strength 7.4
Durability 8.2
| |||||||
Top Speed
Acceleration 6.7
Control 7.3
Strength 7.7
Durability 7.8
| |||||||
Top Speed
Acceleration 7.3
Control 7.6
Strength 7.1
Durability 9.6
| |||||||
Top Speed
Acceleration 7.3
Control 6.9
Strength 7.1
Durability 10.0
| |||||||
Top Speed
Acceleration 7.3
Control 6.9
Strength 7.8
Durability 9.6
| |||||||
Top Speed
Acceleration 6.7
Control 4.8
Strength 3.3
Durability 8.9
| |||||||
Top Speed
Acceleration 6.7
Control 3.9
Strength 3.3
Durability 9.3
| |||||||
Top Speed
Acceleration 6.7
Control 3.9
Strength 4.3
Durability 8.9
| |||||||
Spano
Racer (
Unlock: missing rank cop
|
Top Speed
Acceleration 8.4
Control 7.7
Strength 6.9
Durability 7.6
| ||||||
Spano
Racer (
Unlock: missing rank enf
|
Top Speed
Acceleration 8.4
Control 7.1
Strength 6.9
Durability 8.0
| ||||||
Spano
Racer (
Unlock: missing rank uc
|
Top Speed
Acceleration 8.4
Control 7.1
Strength 7.2
Durability 7.6
| ||||||
Top Speed
Acceleration 14.8
Control 9.7
Strength 7.5
Durability 7.3
| |||||||
Top Speed
Acceleration 14.8
Control 9.3
Strength 7.5
Durability 7.7
| |||||||
Top Speed
Acceleration 14.8
Control 9.3
Strength 7.7
Durability 7.3
| |||||||
Top Speed
Acceleration 8.6
Control 9.3
Strength 8.3
Durability 9.8
| |||||||
Top Speed
Acceleration 8.6
Control 8.8
Strength 8.3
Durability 10.2
| |||||||
Top Speed
Acceleration 8.6
Control 8.8
Strength 8.5
Durability 9.8
| |||||||
Top Speed
Acceleration 7.8
Control 6.9
Strength 6.6
Durability 9.8
| |||||||
Top Speed
Acceleration 7.8
Control 6.3
Strength 6.6
Durability 10.2
| |||||||
Top Speed
Acceleration 7.8
Control 6.3
Strength 6.9
Durability 9.8
| |||||||
Top Speed
Acceleration 14.3
Control 9.4
Strength 7.1
Durability 7.6
| |||||||
Top Speed
Acceleration 14.3
Control 9.0
Strength 7.1
Durability 8.0
| |||||||
Top Speed
Acceleration 14.3
Control 9.0
Strength 7.3
Durability 7.6
| |||||||
Top Speed
Acceleration 15.0
Control 10.1
Strength 6.9
Durability 7.3
| |||||||
Top Speed
Acceleration 15.0
Control 9.6
Strength 6.9
Durability 7.7
| |||||||
Top Speed
Acceleration 15.0
Control 9.6
Strength 7.1
Durability 7.3
| |||||||
Top Speed
Acceleration 8.3
Control 10.1
Strength 8.3
Durability 9.8
| |||||||
Top Speed
Acceleration 8.3
Control 9.6
Strength 8.3
Durability 10.2
| |||||||
Top Speed
Acceleration 8.3
Control 9.6
Strength 8.5
Durability 9.8
| |||||||
Top Speed
Acceleration 6.7
Control 7.4
Strength 6.7
Durability 8.4
| |||||||
Top Speed
Acceleration 6.7
Control 6.6
Strength 6.7
Durability 8.8
| |||||||
Top Speed
Acceleration 6.7
Control 6.6
Strength 7.4
Durability 8.4
| |||||||
Top Speed
Acceleration 6.7
Control 7.4
Strength 6.6
Durability 8.4
| |||||||
Top Speed
Acceleration 6.7
Control 6.7
Strength 6.6
Durability 8.8
| |||||||
Top Speed
Acceleration 6.7
Control 6.7
Strength 7.3
Durability 8.4
| |||||||
Top Speed
Acceleration 7.5
Control 7.7
Strength 7.0
Durability 8.4
| |||||||
Top Speed
Acceleration 7.5
Control 7.1
Strength 7.0
Durability 8.8
| |||||||
Top Speed
Acceleration 7.5
Control 7.1
Strength 7.3
Durability 8.4
| |||||||
Top Speed
Acceleration 7.7
Control 7.7
Strength 8.4
Durability 8.7
| |||||||
Top Speed
Acceleration 7.7
Control 7.1
Strength 8.4
Durability 9.1
| |||||||
Top Speed
Acceleration 7.7
Control 7.1
Strength 8.7
Durability 8.7
| |||||||
Top Speed
Acceleration 8.3
Control 9.6
Strength 8.0
Durability 9.8
| |||||||
Top Speed
Acceleration 8.3
Control 9.1
Strength 8.0
Durability 10.2
| |||||||
Top Speed
Acceleration 8.3
Control 9.1
Strength 8.2
Durability 9.8
| |||||||
Top Speed
Acceleration 6.7
Control 6.8
Strength 7.0
Durability 7.3
| |||||||
Top Speed
Acceleration 6.7
Control 6.0
Strength 7.0
Durability 7.7
| |||||||
Top Speed
Acceleration 6.7
Control 6.0
Strength 7.7
Durability 7.3
| |||||||
Top Speed
Acceleration 4.9
Control 6.6
Strength 5.8
Durability 7.6
| |||||||
Top Speed
Acceleration 4.9
Control 5.7
Strength 5.8
Durability 8.0
| |||||||
Top Speed
Acceleration 4.9
Control 5.7
Strength 6.8
Durability 7.6
| |||||||
Top Speed
Acceleration 7.2
Control 8.3
Strength 7.6
Durability 8.7
| |||||||
Top Speed
Acceleration 7.2
Control 7.7
Strength 7.6
Durability 9.1
| |||||||
Top Speed
Acceleration 7.2
Control 7.7
Strength 7.9
Durability 8.7
| |||||||
Top Speed
Acceleration 9.1
Control 8.3
Strength 7.9
Durability 7.3
| |||||||
Top Speed
Acceleration 9.1
Control 7.7
Strength 7.9
Durability 7.7
| |||||||
Top Speed
Acceleration 9.1
Control 7.7
Strength 8.2
Durability 7.3
| |||||||
C 63 AMG Coupé Black Series
Racer (
Unlock: missing rank cop
|
Top Speed
Acceleration 3.7
Control 7.0
Strength 6.4
Durability 9.8
| ||||||
C 63 AMG Coupé Black Series
Racer (
Unlock: missing rank enf
|
Top Speed
Acceleration 3.7
Control 6.2
Strength 6.4
Durability 10.2
| ||||||
C 63 AMG Coupé Black Series
Racer (
Unlock: missing rank uc
|
Top Speed
Acceleration 3.7
Control 6.2
Strength 7.1
Durability 9.8
| ||||||
McLaren SLR
Racer (
Unlock: missing rank cop
|
Top Speed
Acceleration 7.4
Control 6.6
Strength 5.2
Durability 7.6
| ||||||
McLaren SLR
Racer (
Unlock: missing rank enf
|
Top Speed
Acceleration 7.4
Control 5.8
Strength 5.2
Durability 8.0
| ||||||
McLaren SLR
Racer (
Unlock: missing rank uc
|
Top Speed
Acceleration 7.4
Control 5.8
Strength 5.9
Durability 7.6
| ||||||
Top Speed
Acceleration 6.0
Control 8.2
Strength 8.5
Durability 9.8
| |||||||
Top Speed
Acceleration 6.0
Control 8.2
Strength 8.5
Durability 9.8
| |||||||
Top Speed
Acceleration 6.0
Control 7.6
Strength 8.5
Durability 10.2
| |||||||
Top Speed
Acceleration 6.0
Control 7.6
Strength 8.8
Durability 9.8
| |||||||
Top Speed
Acceleration 5.9
Control 7.5
Strength 5.2
Durability 7.8
| |||||||
Top Speed
Acceleration 5.9
Control 6.8
Strength 5.2
Durability 8.2
| |||||||
Top Speed
Acceleration 5.9
Control 6.8
Strength 5.9
Durability 7.8
| |||||||
Top Speed
Acceleration 7.0
Control 7.7
Strength 7.3
Durability 7.8
| |||||||
Top Speed
Acceleration 7.0
Control 7.1
Strength 7.3
Durability 8.2
| |||||||
Top Speed
Acceleration 7.0
Control 7.1
Strength 7.6
Durability 7.8
| |||||||
Top Speed
Acceleration 6.7
Control 6.1
Strength 5.8
Durability 7.8
| |||||||
Top Speed
Acceleration 6.7
Control 5.2
Strength 5.8
Durability 8.2
| |||||||
Top Speed
Acceleration 6.7
Control 5.2
Strength 6.8
Durability 7.8
| |||||||
Icon.png)
Icon.png)
Icon.png)
Icon.png)
Icon.png)
Icon.png)
Icon.png)
Icon.png)
Icon.png)
Icon.png)
Icon.png)
Icon.png)
Impounded Vehicles
| Image | Make | Rank | Specifications | ||||
|---|---|---|---|---|---|---|---|
Top Speed
Acceleration 8.4
Control 8.1
Strength 7.9
Durability 10.2
| |||||||
| Pursuit | |
|---|---|
| Police | Bounty · Heat Level · Hiding Spots · Pursuit Breaker · Tactics |